The best EV ownership upgrade you can make is installing a home EV charger. Public stations are great when you need them, but nothing beats waking up every morning with a full battery. The trick is knowing how to install a home EV charger without blowing your budget, overloading your panel, or tangling with your local inspector.
Before you pick up a drill
Why installing a home EV charger is worth it
The big benefits of home charging
Why most EV drivers end up installing Level 2 at home
Time back in your day
Lower fueling costs
Better ownership experience
As EV adoption grows, more utilities are designing special EV rates and rebates around home charging. If you’re buying a used EV from a marketplace like Recharged, pairing that car with a well‑planned home charger is what makes the switch truly seamless.
Level 1 vs Level 2: what are you actually installing?
Home charging options at a glance
Understand the difference before you spend money on hardware or electrical work.
| Type | Voltage | Approx. Speed | Typical Use | Pros | Cons |
|---|---|---|---|---|---|
| Level 1 (included cord) | 120V | 3–5 miles of range/hour | Light, occasional driving | No install cost, uses standard outlet | Too slow for most daily drivers |
| Level 2 plug-in | 240V | 20–40 miles of range/hour | Most daily drivers | Fast, flexible, can unplug and relocate | Requires 240V outlet and dedicated circuit |
| Level 2 hardwired | 240V | Up to 50+ miles of range/hour (vehicle‑dependent) | High mileage or multiple EVs | Clean install, supports higher amperage | Less flexible, requires electrician to move |
Most homeowners installing a "home EV charger" are installing a Level 2, 240‑volt solution.
Rule of thumb
Can you install a home EV charger yourself?
What many owners do themselves
- Choose the charger model and amperage.
- Decide on the mounting spot and cable routing.
- Get multiple quotes from licensed electricians.
- Apply for utility rebates or tax credits.
What should be left to a pro
- Running new 240V wiring and installing breakers.
- Upgrading or replacing your electrical panel.
- Pulling required electrical permits.
- Final connections and testing to code.
Unless you’re a licensed electrician, think of this as a plan‑and‑supervise project, not a DIY wiring job.
Serious safety note
Step 1: Plan your installation like a pro
Home EV charger planning checklist
1. Decide where the car will park most nights
Consistent parking makes everything easier. If you can, park within 10–18 feet of where the charger will sit so the cable reaches comfortably.
2. Pick a charger location near the panel
Shorter wire runs mean lower cost and fewer problems. A garage wall that backs onto the panel is ideal, but an exterior wall or carport can work too.
3. Choose plug‑in vs hardwired
A <strong>plug‑in charger</strong> uses a NEMA 14‑50 or similar outlet and offers flexibility. A <strong>hardwired charger</strong> is tidier and can support higher amperage. Your electrician can help you pick.
4. Think about future EVs
If you may add a second EV or upgrade to a larger‑battery model, it can be smart to size the circuit for a higher‑amp charger now, even if you dial it back in software today.
5. Check HOA or building rules
In condos, townhomes, or rentals, you may need written approval, a specific mounting location, or proof of professional installation.
Step 2: Check your electrical panel capacity
Why your electrical panel matters
Open your main panel door and look for the main breaker rating (often 100A, 150A, or 200A) and how many spaces are available. A licensed electrician will perform a proper load calculation based on the rest of your home’s appliances, but you can get a rough sense by knowing your panel size and how "crowded" it looks.
Don’t guess on capacity
- If you already have a 200A panel with a few open spaces, adding a 40A or 50A EV circuit is often straightforward.
- If you have an older 100A panel, or your panel is already packed, expect a serious conversation about load management or a full panel upgrade.
- Some modern smart panels and load‑sharing chargers can let you add EV charging without a full upgrade, by throttling the charger when your home is drawing heavy loads.
Step 3: Permits, code, and utility rules
Most U.S. cities and many rural counties require an electrical permit and inspection for a new 240V EV circuit. Permit fees typically run from about $50 to a few hundred dollars, and your electrician can usually pull them for you.
What inspectors look for
Who should handle permits and red tape?
Make it part of your installer quote, not an afterthought.
Licensed electrician
- Pulls the electrical permit.
- Schedules inspection after work.
- Knows local amendments to the National Electrical Code (NEC).
You / property manager
- Confirms HOA or landlord requirements.
- Coordinates any parking or signage rules.
- Submits utility rebate paperwork once the job is complete.
Step 4: Choose the right home EV charger
Key decisions when choosing a charger
Don’t just sort by price, match your charger to your home and your driving.
| Decision | Why it matters | What to consider |
|---|---|---|
| Amperage (charging speed) | Higher amps can add range faster, but only if your car and panel can handle it. | Check your EV’s max AC charge rate. There’s little benefit in a 48A charger if your car tops out at 32A. |
| Plug‑in vs hardwired | Affects flexibility, code requirements, and resale. | Plug‑in (NEMA 14‑50) is easy to relocate. Hardwired is cleaner and can support higher current. |
| Cable length | Too short and you’ll hate it; too long and you’re wrestling a hose. | Aim for 20–25 feet so you can reach either end of the car without precise parking. |
| Smart features | Control, monitoring, and off‑peak scheduling can cut your bill. | Look for Wi‑Fi, utility integration, and scheduled charging, especially if your utility offers time‑of‑use rates. |
| Indoor vs outdoor rating | Charger location dictates weatherproofing and hardware options. | Outdoor installs need NEMA 3R or better enclosures and properly sealed conduit runs. |
Most drivers are happy with a 32–40 amp smart Level 2 charger on a 40–50 amp circuit.
Future‑proof just enough
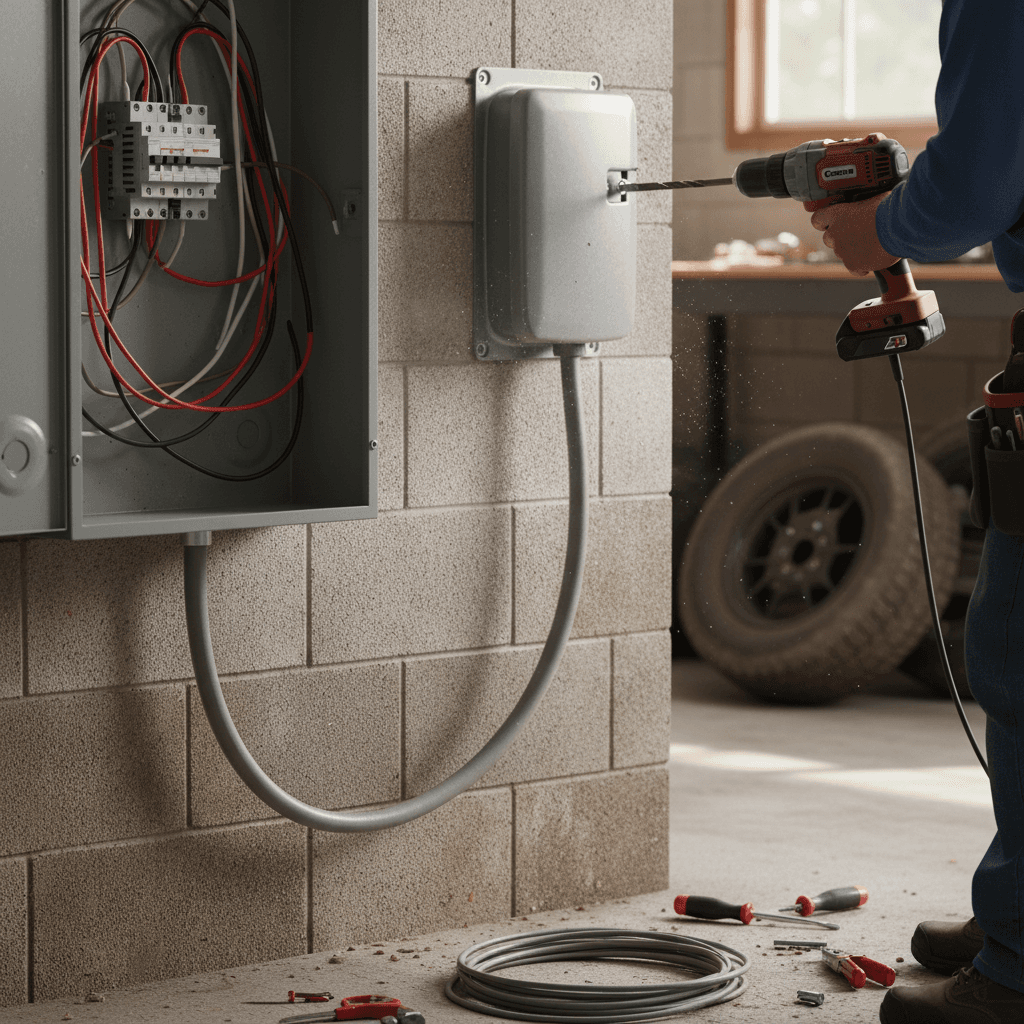
Step 5: Wiring, mounting, and inspection day
What a typical professional install day looks like
1. Walkthrough and final placement
You and the electrician agree on charger height, cable routing, and where the cars will park. This is the time to speak up about daily routines and obstacles.
2. Shut down power and rough‑in wiring
The electrician shuts off the main breaker, installs the new breaker, and runs conduit or cable from the panel to the charger location.
3. Mount the charger or outlet
They mount the wall unit or outlet box, secure conduit, and leave enough slack for strain relief and future service.
4. Make final connections and label
Wires are landed in the panel and the charger, connections are torqued to spec, and the new circuit is clearly labeled.
5. Test, configure, and connect to Wi‑Fi
With power back on, they verify voltage, start a test charge, and, on smart chargers, help you set up the app and any schedules.
6. Inspection and sign‑off
Your jurisdiction’s inspector checks the work. Once signed off, you’re officially good to charge.
What “good” looks like
What it really costs to install a home EV charger
Typical Level 2 home charger installation costs (2025, U.S.)
Simple installs, panel in the garage, short run, no drywall surgery, often land at the lower end of that range. Long runs, finished walls, outdoor pedestals, or panel upgrades quickly pull you toward the top. Get at least two or three quotes; pricing for identical work can easily vary by 40% between electricians.
Sample cost scenarios
Realistic ranges to help you budget before you call an electrician.
| Scenario | What’s involved | Typical total |
|---|---|---|
| Simple install | Panel in attached garage, 25A–32A plug‑in charger, short surface‑mounted run. | $800–$1,300 |
| Standard install | New 40A circuit to opposite garage wall, some conduit, mid‑range smart charger. | $1,200–$2,000 |
| Complex install | Panel upgrade plus long run to detached garage or outdoor parking, higher‑amp hardwired charger. | $2,500–$5,000+ |
Actual costs vary by region and labor rate, but these buckets are a useful starting point.
How to save with incentives and smart timing
Federal tax credit snapshot (2025–2026)
- Check your utility’s EV programs before you buy; many offer rebates for specific charger models or require pre‑approval.
- Ask electricians if they’re familiar with local rebates and load‑management rules, experienced installers can help you maximize incentives.
- If you’re already planning other electrical work or a panel upgrade, bundle the EV charger to save on labor and permitting fees.
- Use your charger’s app or your EV’s settings to schedule charging during off‑peak hours once everything is installed. It won’t change install cost, but it can shave your ongoing fuel bill.
Time it with your EV purchase
Safety checklist for your new home charger
Home EV charger safety best practices
Use a properly rated circuit
Your breaker, wire, and charger rating should all match the continuous load your EV will draw. Never “oversize” a breaker just to stop nuisance trips.
Avoid extension cords and adapters
Don’t run your charger through generic extension cords, splitters, or improvised adapters. They can overheat and become fire hazards.
Keep cords off sharp edges
Route the cable where it won’t be pinched by garage doors, driven over repeatedly, or kinked around tight corners.
Protect outdoor equipment
Use weather‑rated enclosures and fittings, maintain drip loops, and keep snow, ice, and sprinklers away from the unit.
Test GFCI protection
If your circuit or outlet is GFCI‑protected, test it regularly so you know it will trip correctly in a fault.
Schedule periodic checkups
Every year or two, have an electrician, or at least a knowledgeable friend, look over connections, conduit, and mounting hardware for wear or damage.
Home EV charger installation FAQ
Frequently asked questions about installing a home EV charger
Installing a home EV charger isn’t just another home project, it’s the backbone of easy, low‑stress EV ownership. If you plan the location carefully, size the circuit sensibly, respect permits and safety rules, and let a licensed electrician handle the high‑voltage work, you’ll end up with a quiet little fueling station that just works. And when you’re ready for your next EV, whether it’s your first or an upgrade from a marketplace like Recharged, you’ll already have the infrastructure at home to support it.